Codettesbootcamp2022 -> Zahira Abdoel
10 Interface & Application Programming
Objectives
Wk 1
[x] Setup Dev Environment for ESP32 S2
[x] Setup NodeJS Dev Environment on your PC
[] Explain the HackOmation quadrant in relation to your final project.
[] Build UI mockups for your Final Project and HTML Layout
Wk 2
[] Build HTML5 Chat app
- Draw mockup / layout
- frame and add id’s to <div>’s
- Style the page and
- wire up the JS code and understand
Wk 3
[] Build Chat app back-end NodeJS
- Build NodeJS server side to:
- host your ChatApp (Express static HTML)
- Build / test API endpoints (for: users & messages)
Wk 4
[] Setup MongoDB datastore & connect via NodeJS
- Setup MongoDB datastore + mongoose ODM (Object-Document-Manager)
- Store and recall message data using an API (ex. request top 100 msg)
- Wire up MongoDB to API endpoints
- Update app-flow to use back-end for Users and “old” messages
Wk 5
[] Create data-bound widgets to display sensor data
- On ESP32 add MQTT client + ArduinoJSON
- Send Sensor data to MQTT server (as a JSON object)
- Create a DataCard, a Gauge and a time Chart widget on Dashboard (use chat app)
- Strategy on DataBinding and Widget updating (Last updated)
- User Login/Pw (state persistence)
[] Add Screenshots and description of the process of creation.
[] Describe the design & programming steps
[] Screenshots or video of your Prototype/app working
[] Describe any errors or problems with the process and how you fixed them.
[] Include all the files you created for download.
10.1 Setup Dev environment ESP32 S2
10.1.1 What is ESP32?
ESP32, like Arduino, is a development board. That means it has all the features you need to create your projects. ESP32 is a low-powered, low-cost microcontroller (MCU) board, with both Wi-Fi and Bluetooth built in, and is based on a dual-core processor mechanism.
10.1.2 Install ESP32 board in Arduino IDE
There’s an add-on for the Arduino IDE that allows you to program the ESP32 using the Arduino IDE and its programming language.
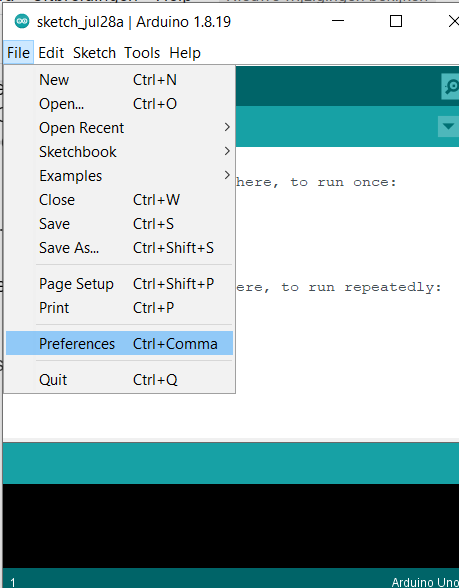
I used the following instructions to install the ESP32 board in Arduino IDE:
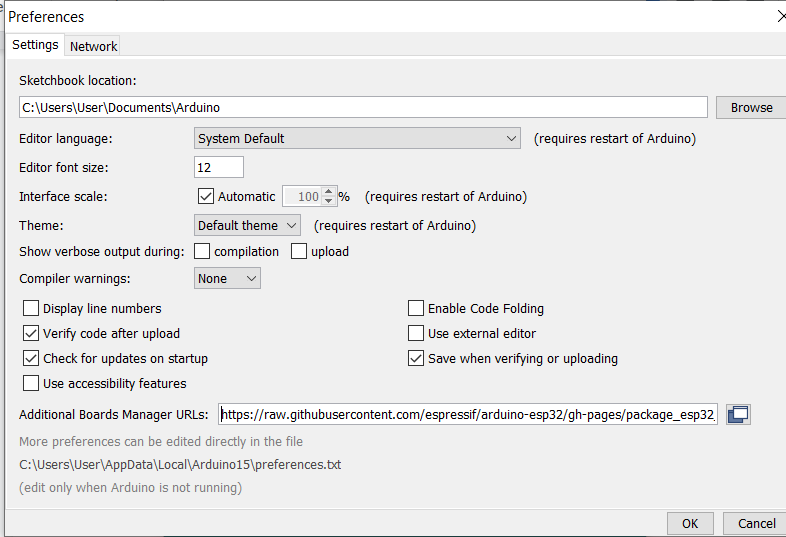
- In your Arduino IDE, go to File> Preferences and enter the following into the “Additional Board Manager URLs” field: https://raw.githubusercontent.com/espressif/arduino-esp32/gh-pages/package_esp32_dev_index.json
-
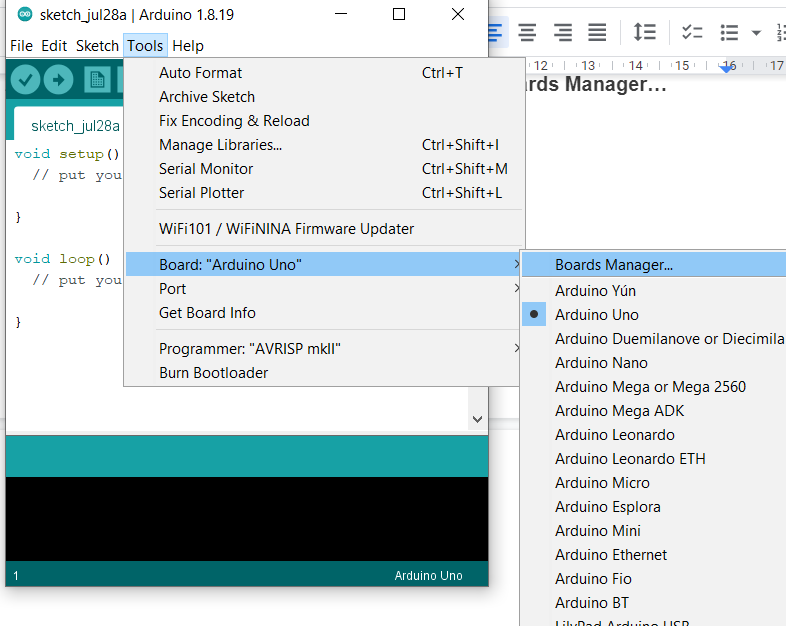
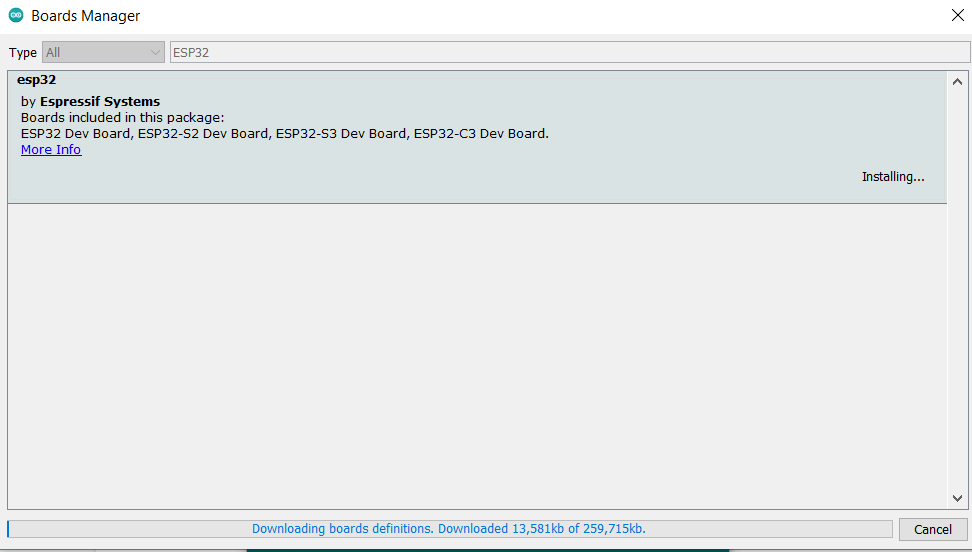
Open the Boards Manager. Go to Tools > Board > Boards Manager…
-
Search for ESP32 and press install button for the “ESP32 by Espressif Systems“:
-
Checking if ESP32 is available
10.3 Business Model Canvas, Pitch & Poster
Objectives
- Setup your BMC for final project
- Setup Pitch Deck
- Create project poster
- Add Screenshots and description of the process of creation.
- Describe the design & programming steps
- Screenshots or video of your Prototype/app working
- Describe any errors or problems with the process and how you fixed them.
- Include all the files you created for download.
10.3.1 Setup project BMC
What is a Business Model Canvas?
A business model canvas is a visual representation of a business model, highlighting all key strategic factors. In other words, it is a general, holistic and complete overview of the company’s workings, customers, revenue streams and more. Canvas were initially proposed in 2005 by Alexander Osterwalder
What’s the purpose of the Business Model Canvas?
Other than providing a general overview of the business model, these canvases enable companies to visualize and analyze their strategy. This includes updating the model as the company evolves, such as changes in the market, new streams or expansions.
It is a template that defines the business - specifically, how each section interacts with the others. For example, understanding the value proposition, the target customer and the channels through which they are engaged all need to be analyzed together, not just in individual vacuums.
Element of the Business Model Canvas
- Value Proposition
- Customer Relationship
- Customer Segments
- Channels
- Key Partners
- Key Activities
- Key Resources
- Cost Structure
- Revenue Stream
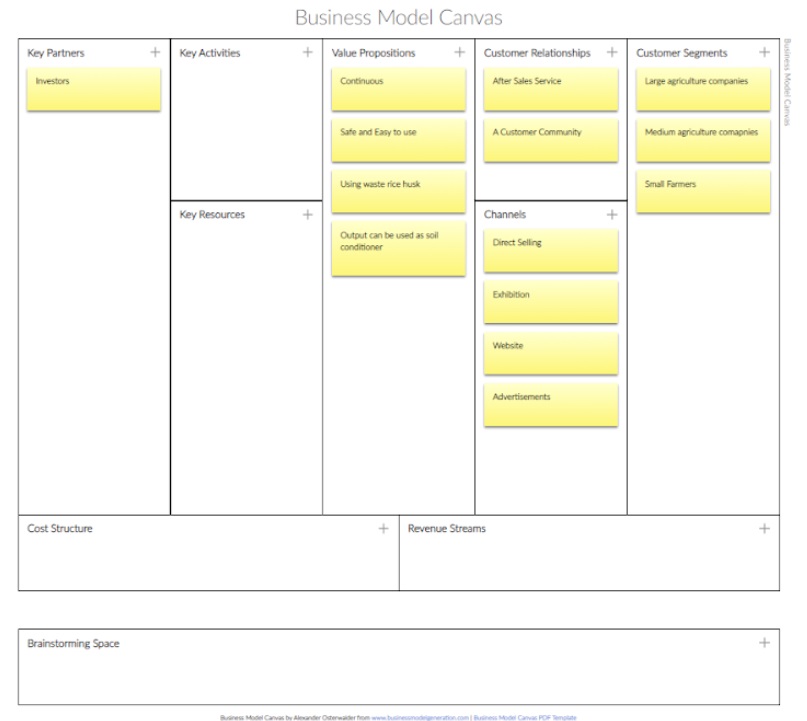
Template Business Model Canvas

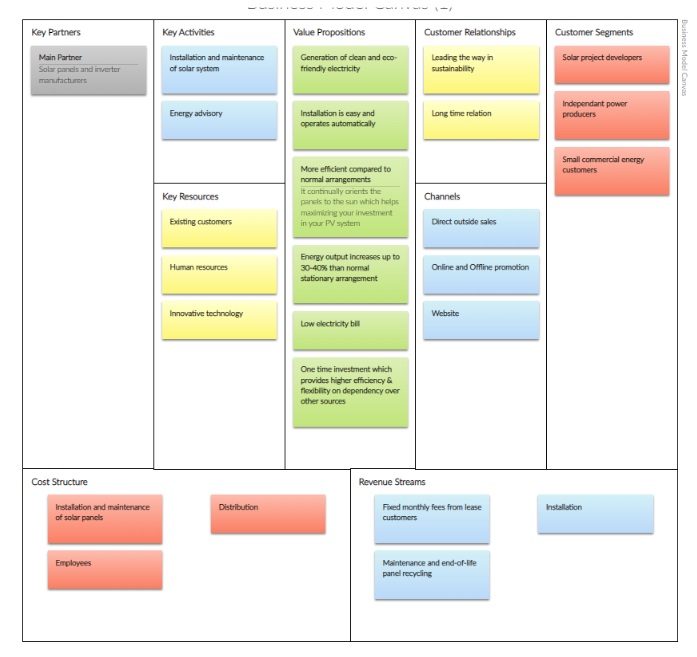
Final Project BMC (Concept)
8 augustus 2022
FINAL BMC
24 januari 2023
10.3.2 Setup project PitchDeck
What is a PitchDeck
A pitch deck, also known as a slide deck or start-up deck, is a presentation that provides a brief but informative overview of your business. It should cover the key points of your business plan, the products and services you provide, high-level financial projections, and funding needs.
Your pitch deck should work well on its own as a visual document, but it will primarily be used as a tool to tell the story of your business.
Things to include in your pitchdeck
- Introduction
- Problem
- Solution
- Product Features
- Timing
- Business Model Canvas (Value proposition)
- Cost Price
- Next Steps
- Demo Project
- Team
Here is the link to my Project Pitchdeck: https://docs.google.com/presentation/d/1Zl2cTAf2jirbQVbZogcGsasVaAwgvvFysw9H8CzQDHk/edit?usp=sharing
10.3.3 Project poster
What is a Project Poster?
The project poster template helps you solve complex problems or tackle projects with unknowns.It is usually a mixture of a brief text mixed with tables, graphs, pictures, and other presentation formats
- Project title and sub-title on top
- Explains your project intro/problem
- Shows your solution (pictures /schema / design)
- Shows impact /charts / graphs
- Plenty visuals of your project
- Cases + pictures
- It should attract visitors to visit your booth
- Team & future planning
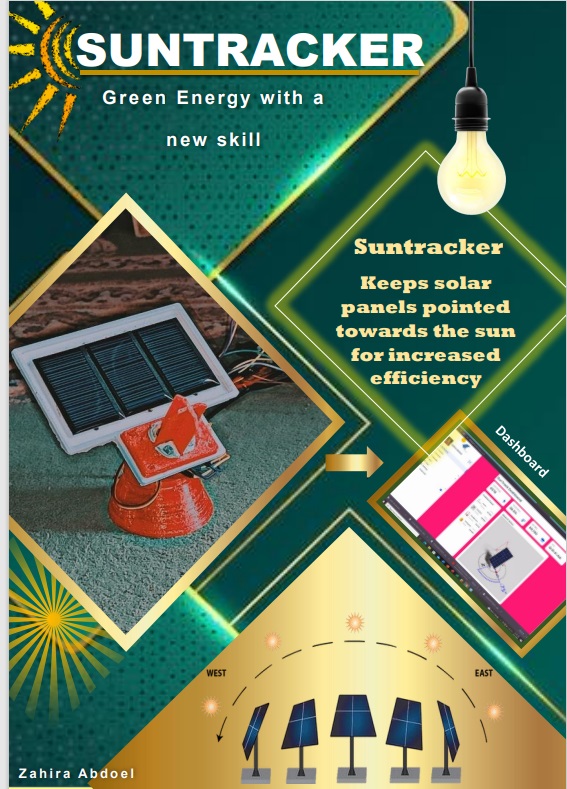
My Project Poster:
10.4 Computer Aided Design (CAD)
Objectives
- Freecad
- Inkscape
- OpenSCad
10.4.1 FreeCad
What is FreeCad?
FreeCAD is a general-purpose parametric 3D computer-aided design (CAD) modeler and a building information modeling (BIM) software application with finite element method (FEM) support.[3] It is intended for mechanical engineering product design but also expands to a wider range of uses around engineering, such as architecture or electrical engineering. Links of some Tutorial videos:
- https://youtu.be/7L1IbjEofCU
- https://youtu.be/Ii5YXgDEegU
- https://youtu.be/hdXk_mR7A5Q
- https://youtu.be/9mQFbBNJJpQ
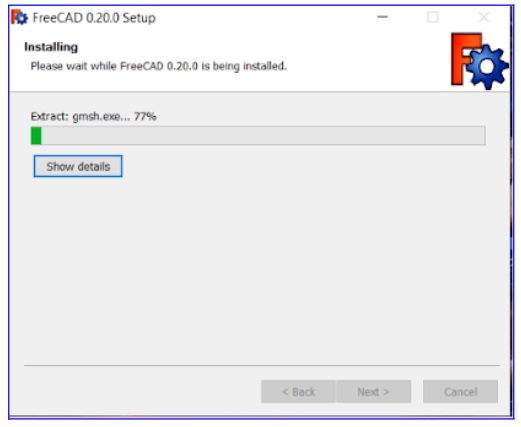
Install Freecad 0.20.0
Select the units (standard(mm/kg/s/degree)
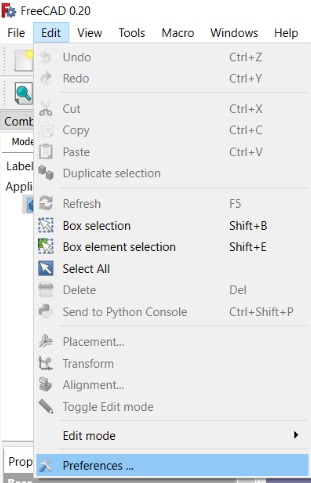
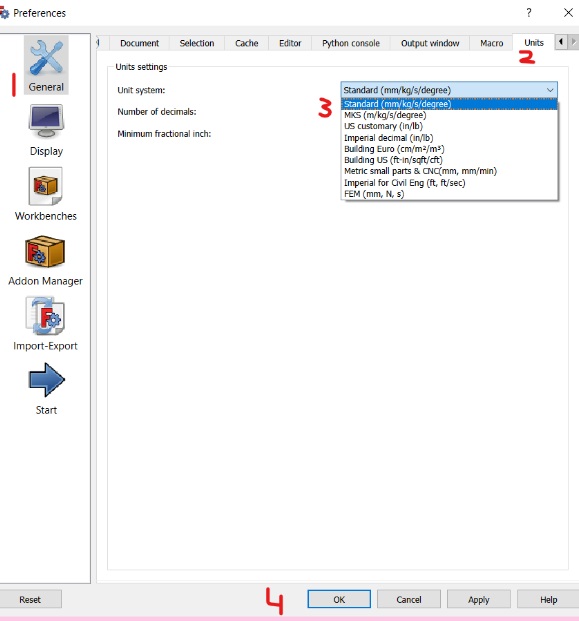
To select the right units open freecad and :
- View the menu items.
- Select “Edit” and then Preferences
- Select General -> Units -> standard(mm/kg/s/degree) -> OK
Create Design
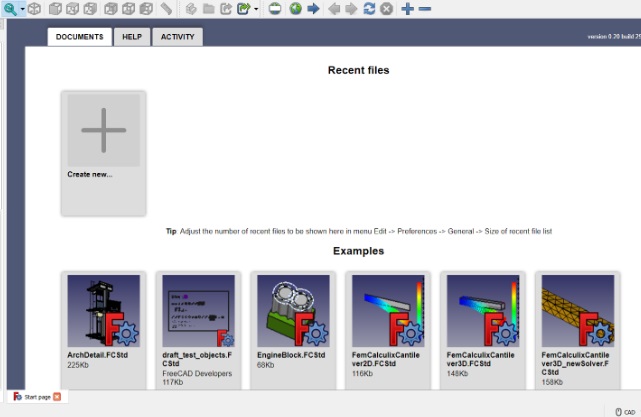
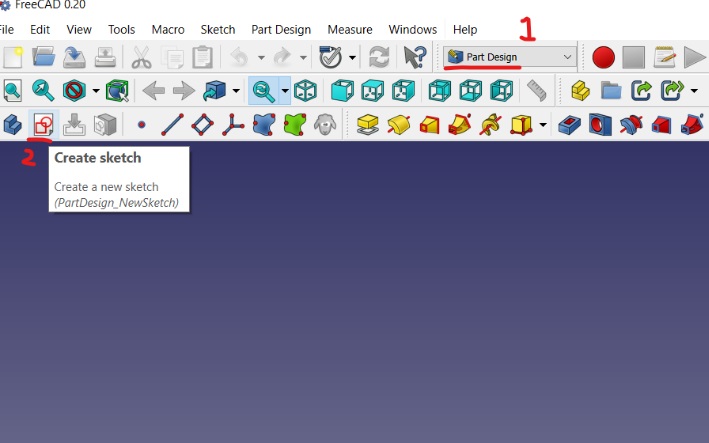
To finally start creating your own design follow the steps:
- Select “START” from Workbench
- Select “Create new project”
- Select “Part Desing”
- Select “Create Sketch”
- Select Plane ->XY Plane

- And then Select “Create Rectangle/Circle/…..”
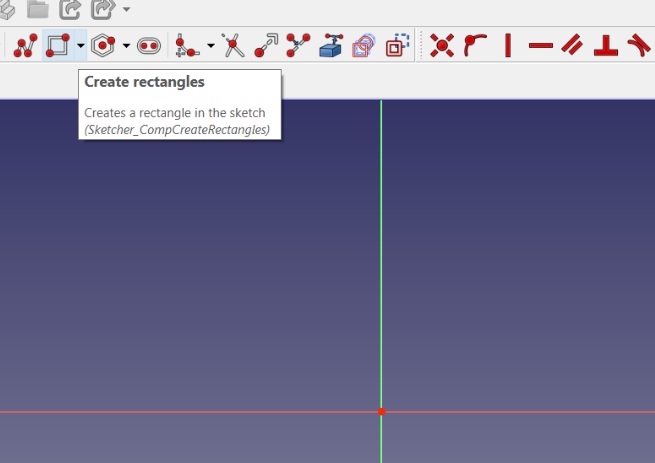
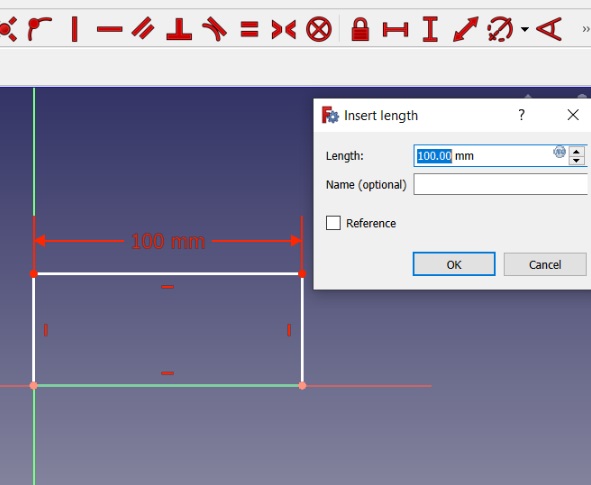
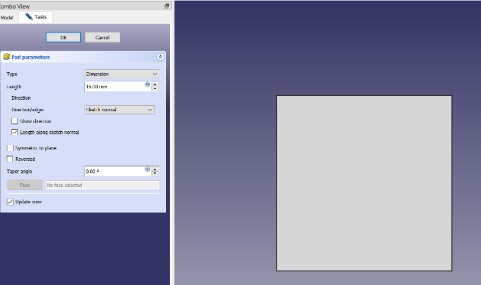
- Select Constraints to fix horizontal and vertical sides and add your dimensions once it prompts you insert length.
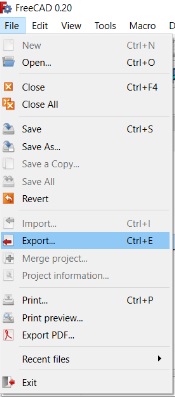
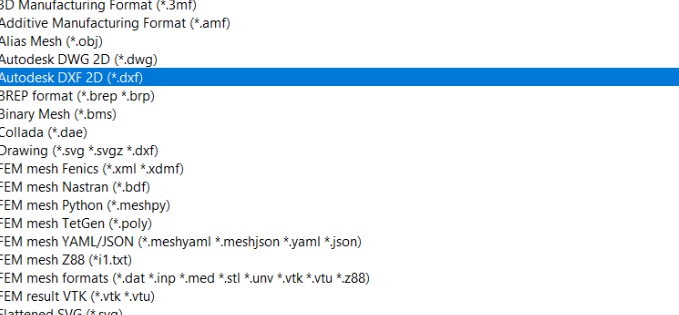
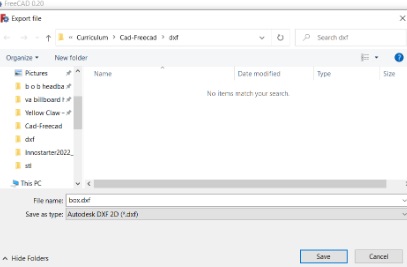
##### Prepare DXF file
- Select File
- Export
- Autodesk DXF 2D
- Save file as name.dxf
Convert 2D -> 3D
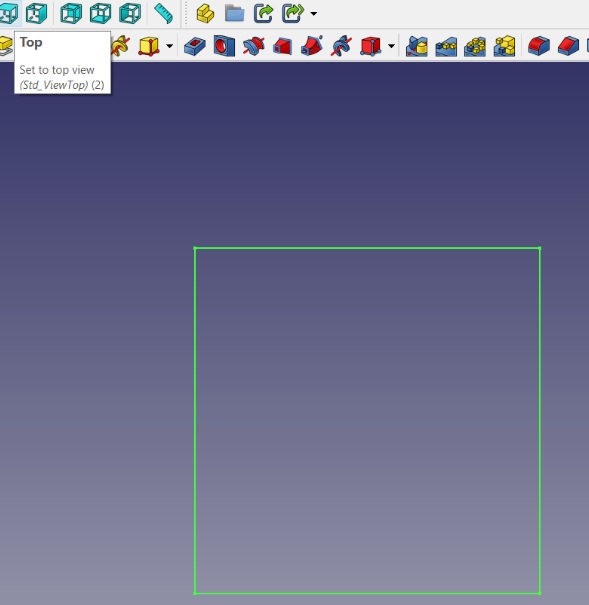
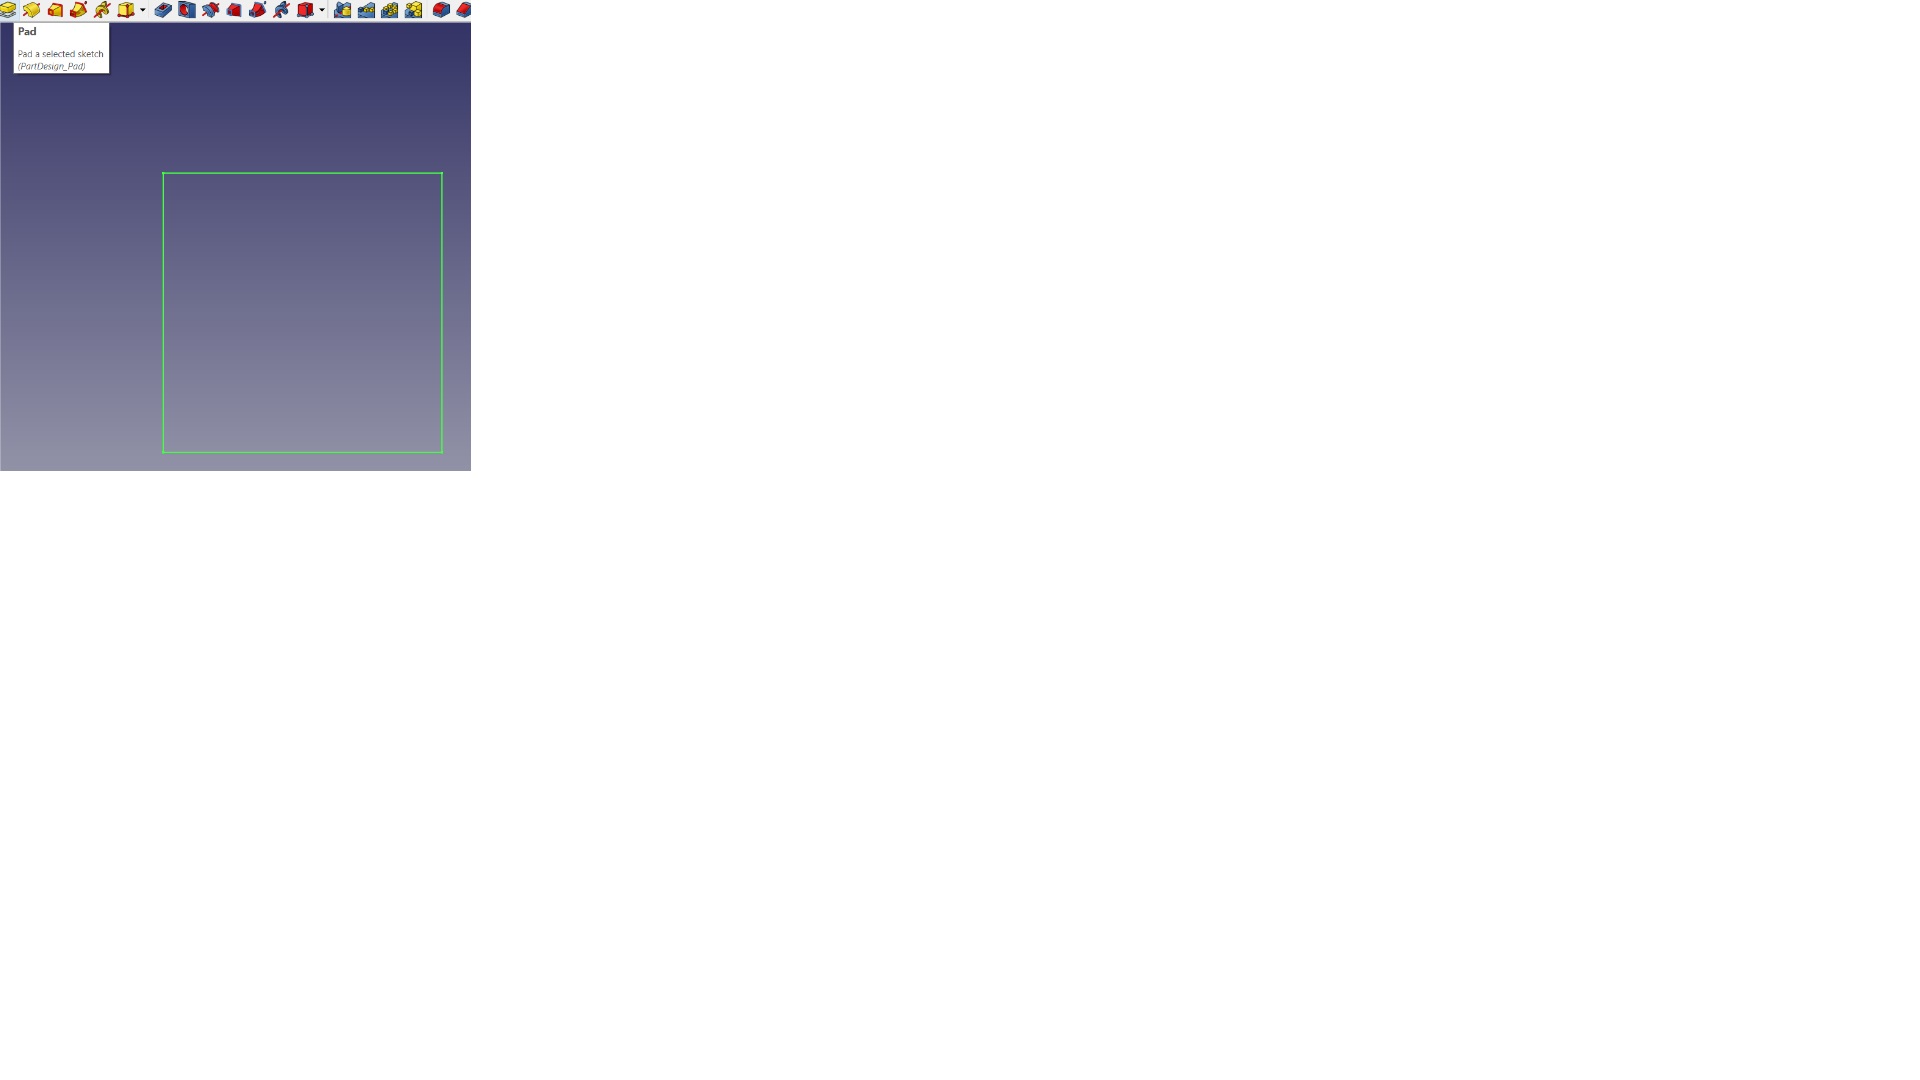
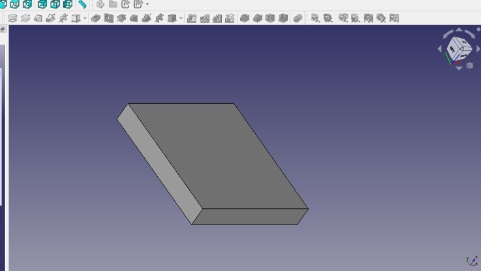
In Freecad it is also possible toconvert the 2D designs to 3D designs. To do so please follow the following steps:
- Select Part Design on Workbench
- Select Top view
- Select PAD
- 2D object convert to 3D
- You can than rotate to see sides
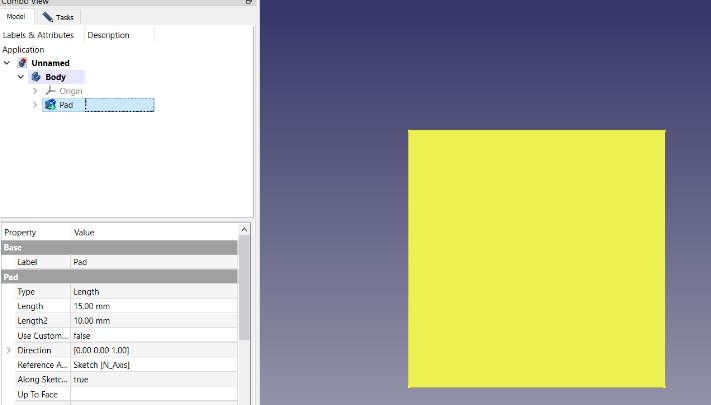
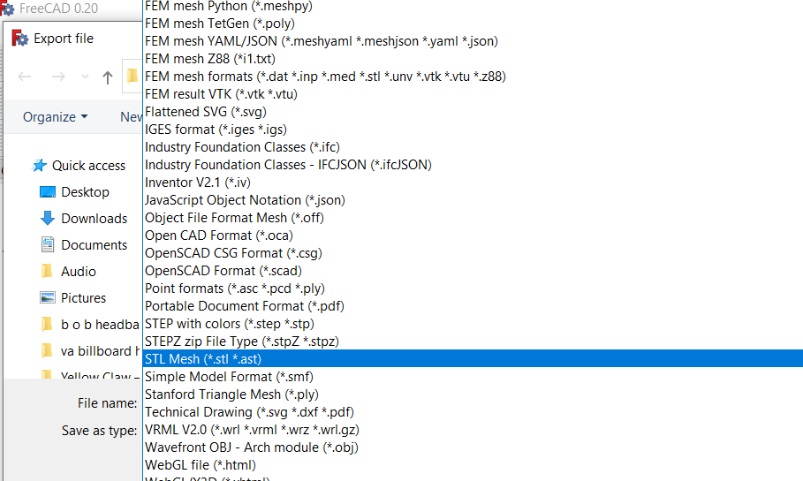
Prepare STL.Mesh File
- Select Model
- Select Pad
- Select file
- Export
- STL Mesh
- Save file
10.4.2 Inkscape
What is inkscape?
Inkscape is a free and open-source vector graphics editor used to create vector images, primarily in Scalable Vector Graphics (SVG) format. Other formats can be imported and exported.
##### Download link FreeCad: https://wiki.freecadweb.org/Download
Download link Inkscape: https://inkscape.org/release/1.1/windows/64-bit/
10.5 Computer Aided Manufacturing (CAM)
What is CAM?
Computer Aided Manufacturing (CAM) is the use of software and computer-controlled machinery to automate a manufacturing process. Process of creating Machine Instructions (GCode) from CAD files. Managing:
- Materials / Stocks
- Tools (mills) & Utilities (cooling)
- Object placement / efficiency
- Operations (type of cuts)
- Production rates (Feeds & Speed)
- Extras (tabs, bones)
- !! Machine constraints !!
#### CAM - for 3D printing
- Download and install Cura
- Import STL (drag/drop)
- Resize and place parts
- Select printer, printer filament material & print settings
-
Slice & Save gcode file to SD card
(CAM - for 3D Printing will be discussed latter in chapter 10.7)
Download Link for Cura: https://ultimaker.com/software/ultimaker-cura
##### Production For the 3D printing we will use the “Anycubic 4 Max Pro” printer How to use:
- Insert SD card on left side (upside down)
- Start printer
- Select “print” scroll to file of print (gcode file)
- Print and wait (printer will heat up first before starting)
CAM - for CNC milling/cutting
10.7 3D Printing
10.7.1 What is 3D printing
Turns digital 3D models into solid objects by building them up in layers. The 3D printing process turns a whole object into thousands of tiny little slices, then makes it from the bottom up, slice by slice. Those tiny layers stick together to form a solid object.
10.7.2 3D Printers & Filaments
There arre two type of printers:
- ** Anycubic Predator (DeltaBot) ** :is a consumer 3D printer that uses DeltaBot technology (three robotic arms attached to a base). The Deltabot uses a print head attached to 3 sets of robotic arms to deposit the material.
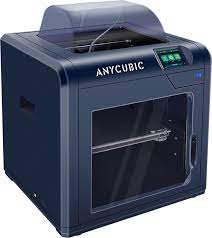
- ** Anycubic 4 Max Pro **: Enclosed Printing space with larger build volume enhance the printing quality, out of box, no need assemble, optional auto power off feature is safer for children. Patented printing platform with excellent adhesion whilst printing and pop off once it cools down. The sensor triggers the machine to pause prints and set off an alarm when filament run out.
We will be 3D printing with the Anycubic Predator (Deltabot)
There are two filaments:
- PLA (Polylactic acid)
- ABS (Acrylonitrile Butadiene styrene)
PLA and ABS are both thermoplastics. PLA is stronger and stiffer than ABS, but poor heat-resistance properties means PLA is mostly a hobbyist material. ABS is weaker less rigid, but also tougher and lighter, making it a better plastic for prototyping applications.
We will be working with the PLA Filament.
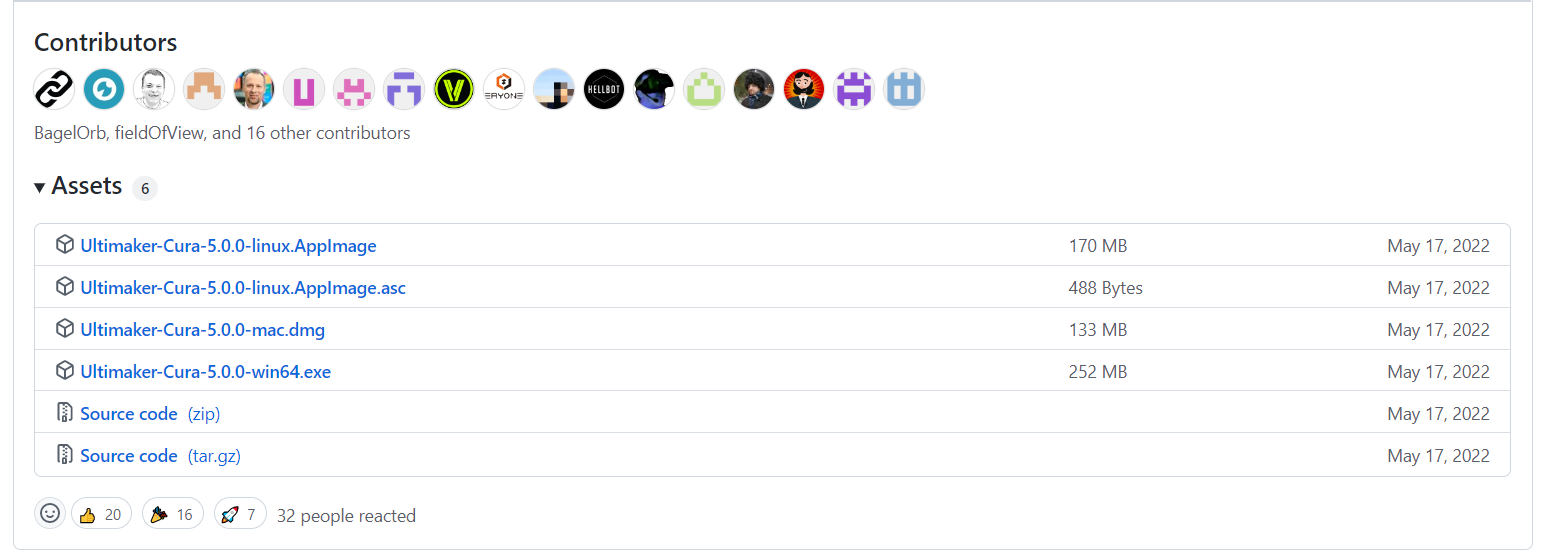
And these are the PLA parameters we have to keep in mind while creating something in Cura
10.7.3 Installing Cura
Cura is an open source slicing application for 3D printers. For the bootcamp we will be using Cura for 3D printing.
I used this link to install Cura version 5.0.0: https://github.com/Ultimaker/Cura/releases/tag/5.0.0
After installing Cura from the .exe file i choosed the “sing up for free” option.
Cura Installed:
10.7.4 Cura settingss
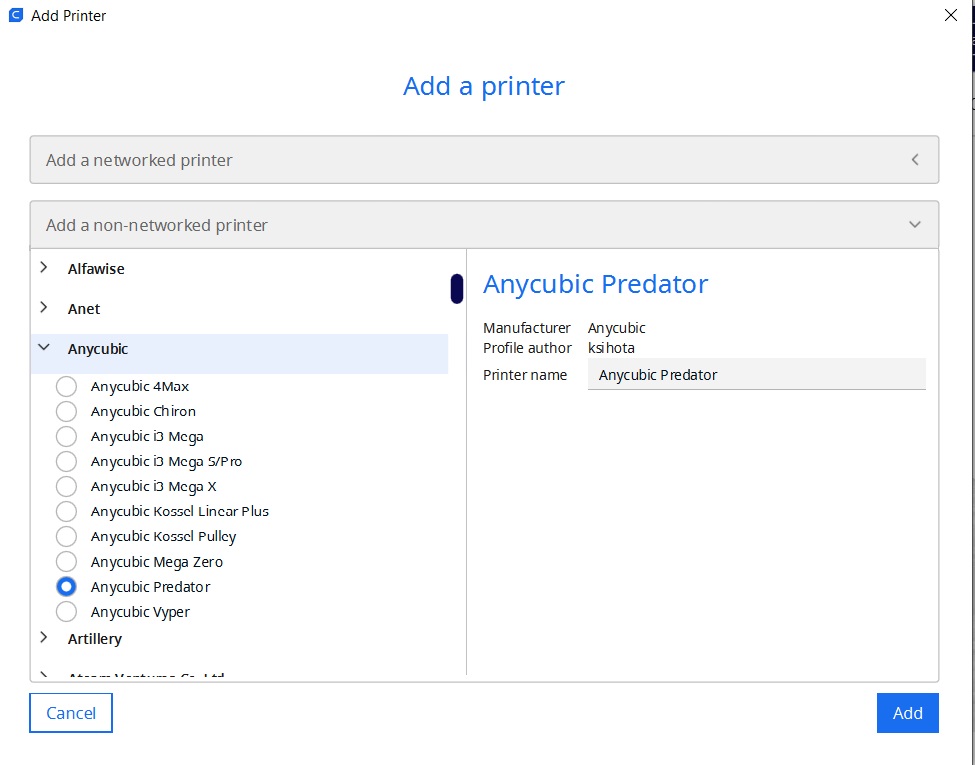
1.The first thing we need to do after opening Cura after installing is selecting the printer we will be working with. So as I said we will be using the Anycubic(Deltabot) printer so i have to to select the anycubic printer.
That can be done by following this:
** SETTINGS → PRINTER → Manage Printer **
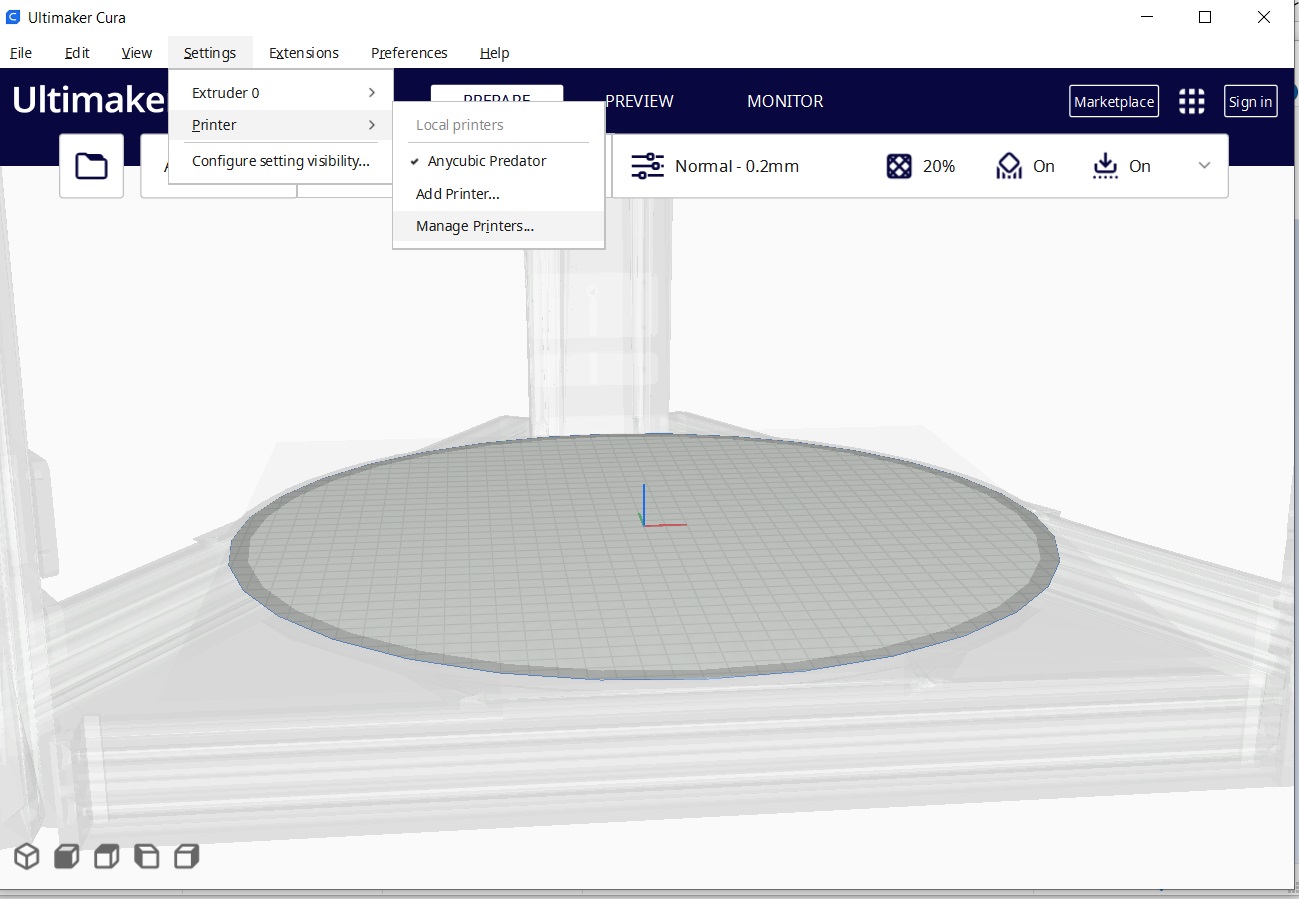
After clicking manage printers we have to click on “Add New” and search for the anycubic predator printer in the “Add a non-networked” bar and than click on “Add”.
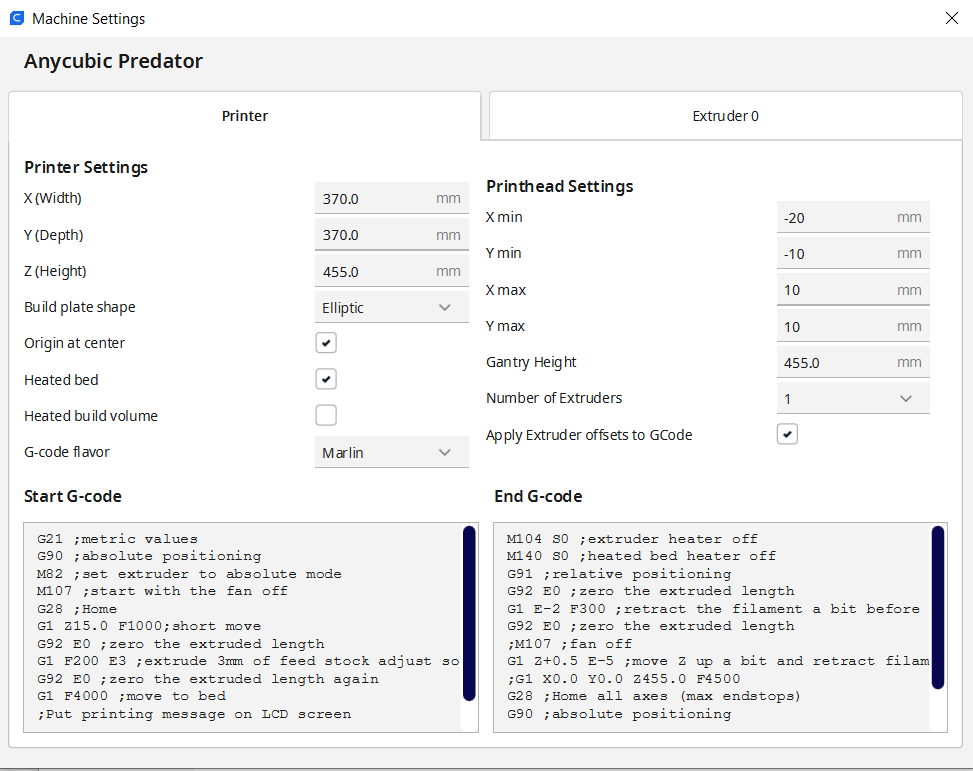
- Machine Settings
Now we have to check if we have the correct dimensions for the X,Y an Z directions . If not than you should probably have a wrong version of cura or another printer installed. We should have the following dimensions: X = 370 Y = 370 Z = 455 It is very important to check these dimensions cause while 3D printing the nozzle moves from top to bottom and if the dimensions are incorrect there are chances that the nozzle can break if it goes down too hard. And if the nozzles is broken the whole machine is ruined.
That can be done by following this:
** SETTINGS → PRINTER → Manage Printer → Machine settings **
- Default Settings
Now we have to check all the PLA Parameters in the print settings. In the image below there are already some settings done but to check all of them we have to press on the “custom” button.
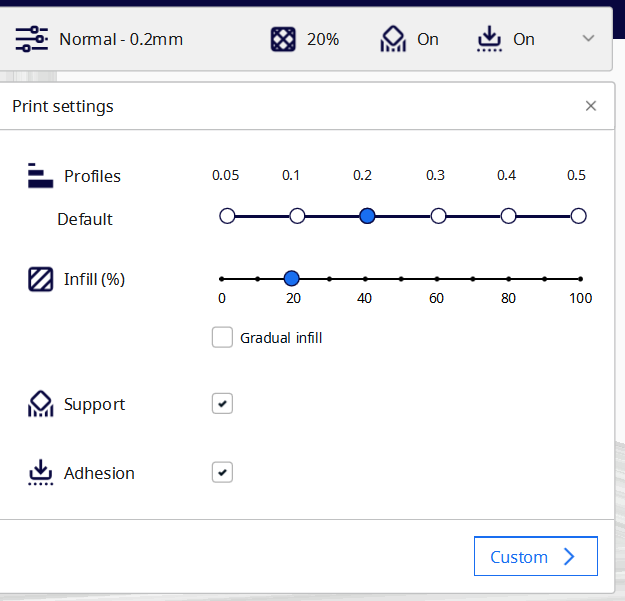
After pressing on custom there appears a list of parameters. We will begin with the first one.
Based on what profile you have selected if will give you the default parameters.
Right now we have selected “normal”
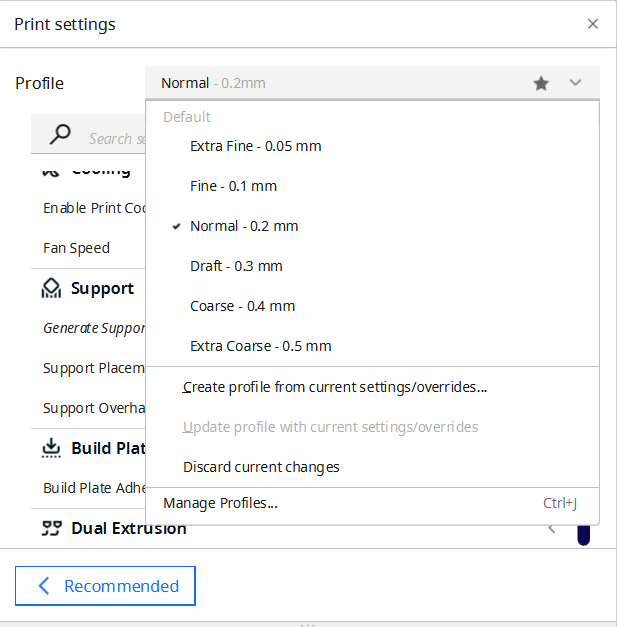
Quality:
- Layer height: 0.2 mm

Walls:
- Wall thickness: 0.8 - 1.2 mm

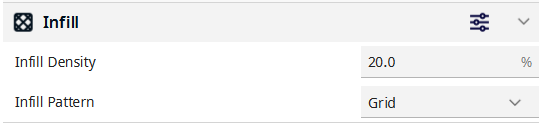
Infill:
- Infill density: 20%
- Infill pattern: you can select any pattern
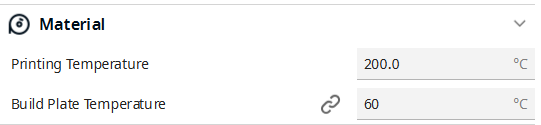
Material:
- Printing temperature: 200
- Build plate temperature: 60
Speed:
- Print speed: 60m/s

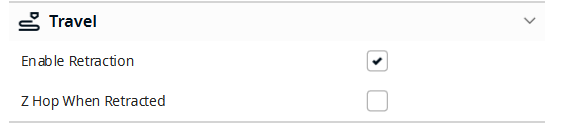
Travel:
- We have to enable retraction here
Cooling:
- We have to enable print cooling here
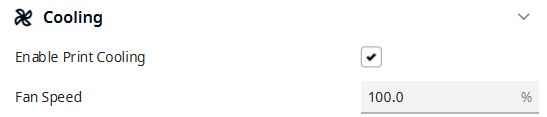
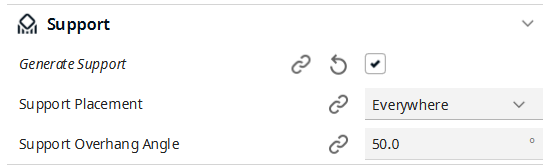
Support:
- Support type: Everywhere
Build plate adhesion:
- Build plate adhesion type: Brim

These are all the parameters we have to check before printing. But once you have the profile selected there is no need to go and check each of the parameters. The parameters that are very important to check are:
- Support
- Cooling fan on
10.7.5 3D Printing Preparations
First we have to design something so that we can 3D print it.
So I used tinkercad for the 3D designing and I designed a cute butterfly keychain.
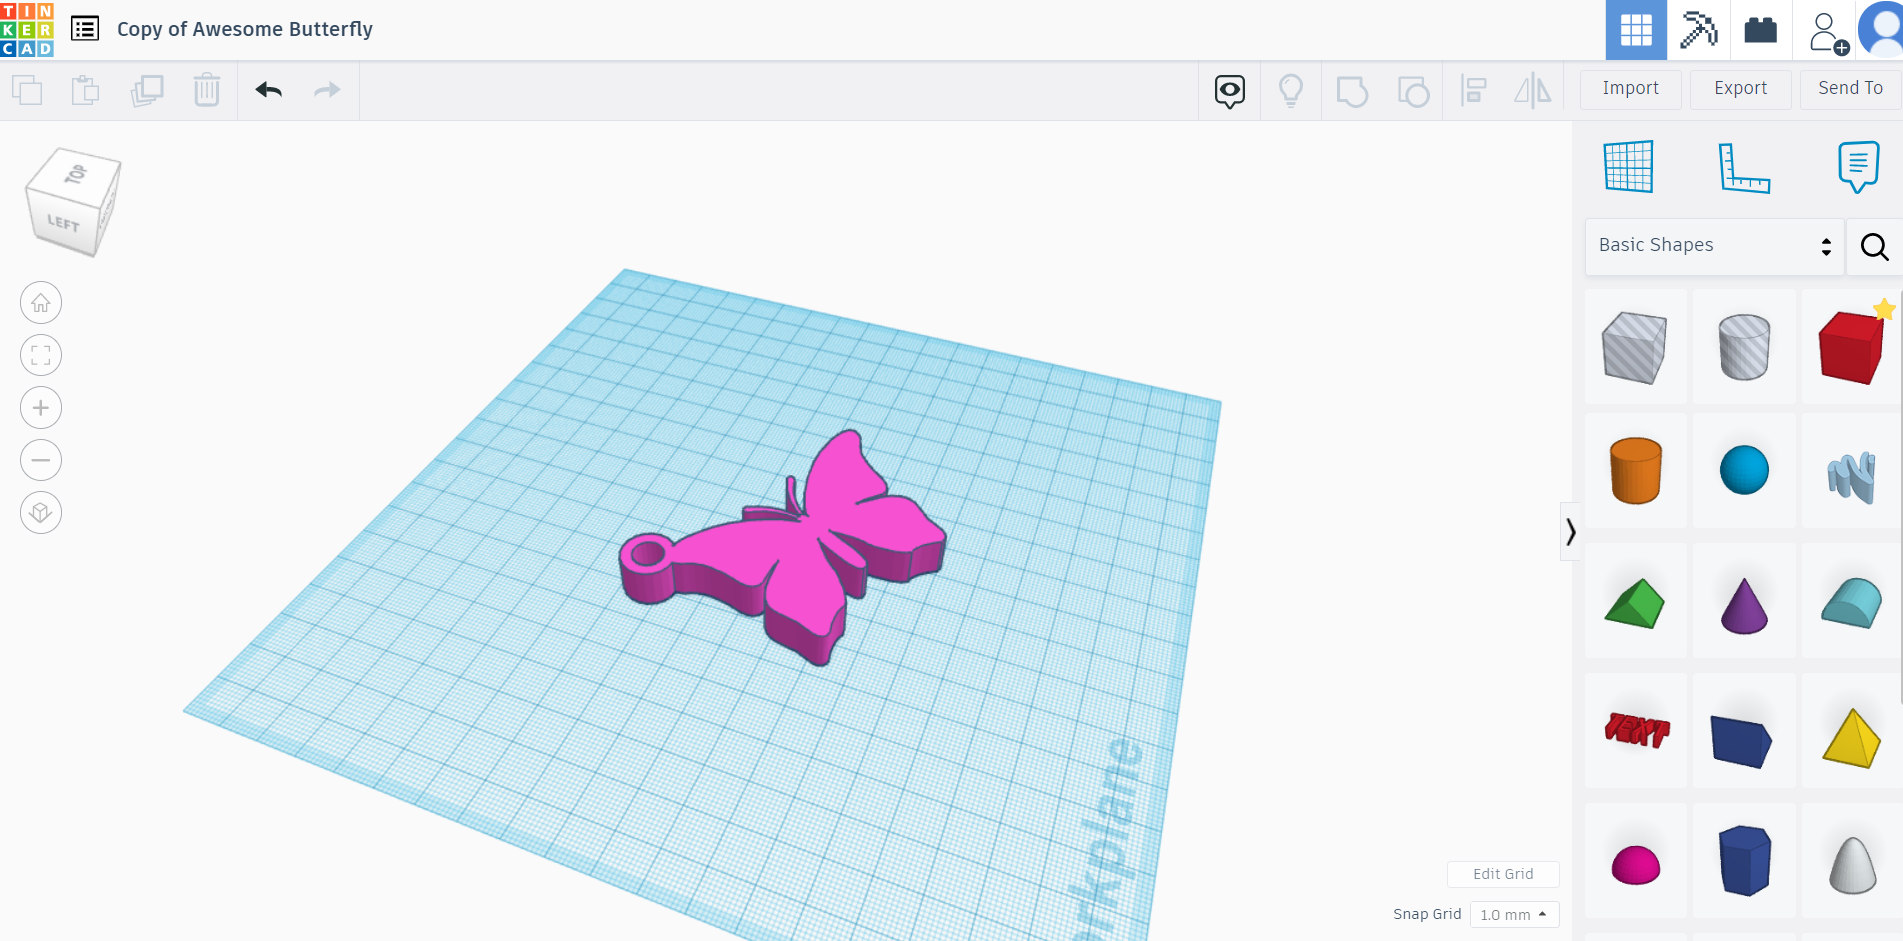
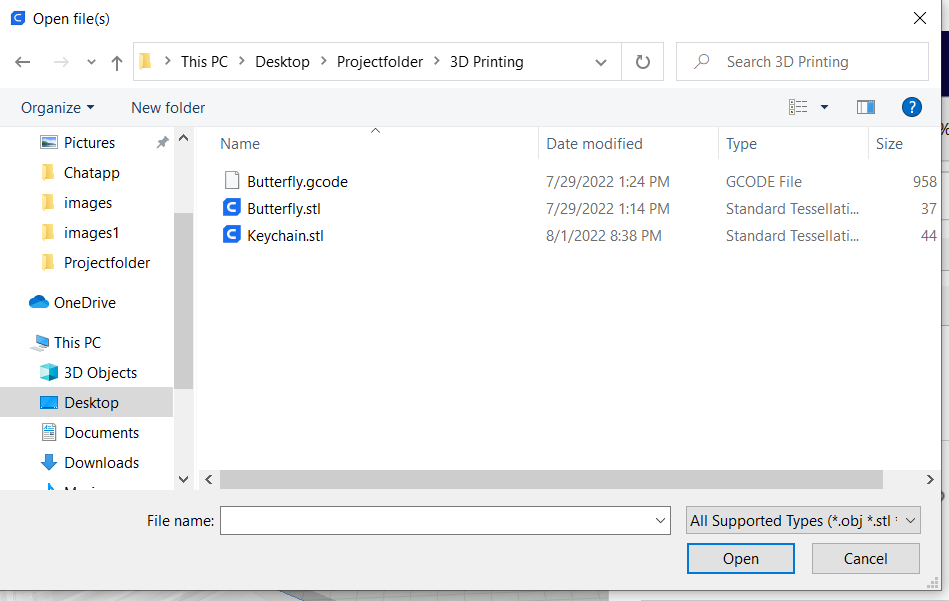
To be able to use this design in Cura we have to export the design as a .STL file and save it anywhere.
I named it Keychain.stl saved the file in a new folder called 3D printing
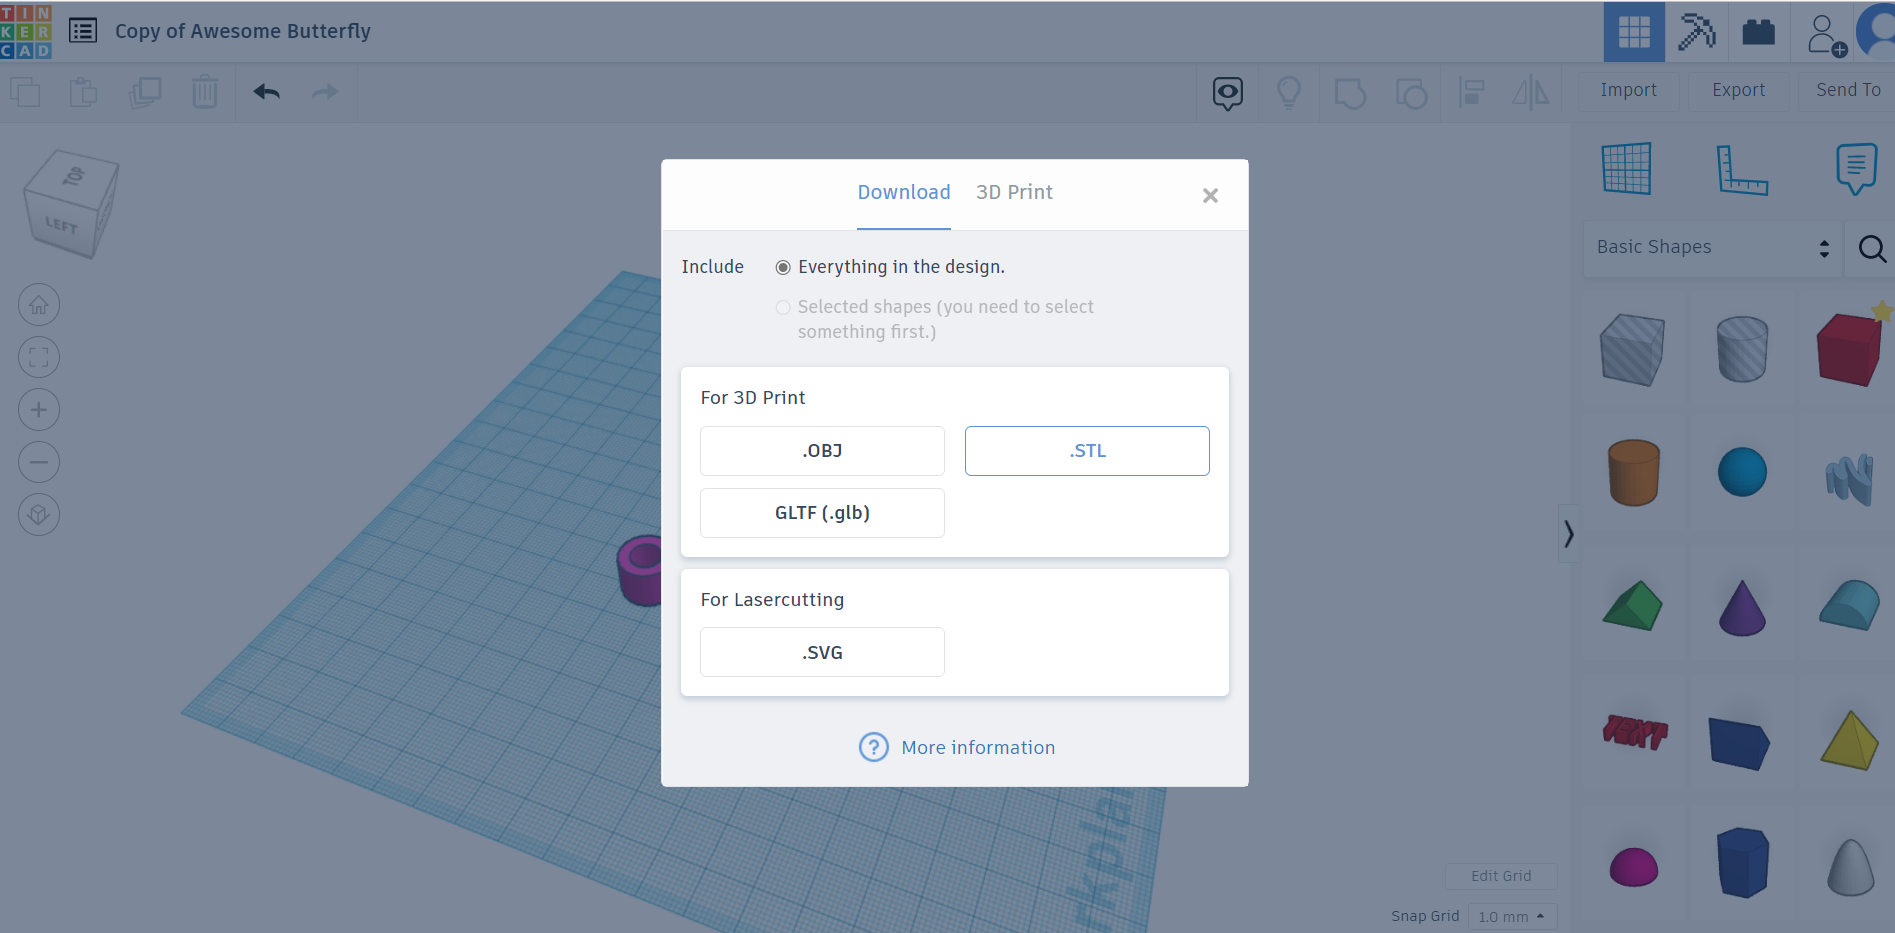
Now to 3D print my design i have to open the .STL file in Cura.
** FILES → Open File(s) **
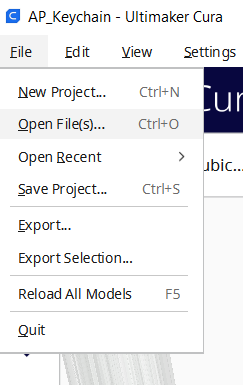
By clicking on “Open file(s)” a tab will appear where you can selct and open your .STL File.
After opening your .STL file your design should appear on the build plate
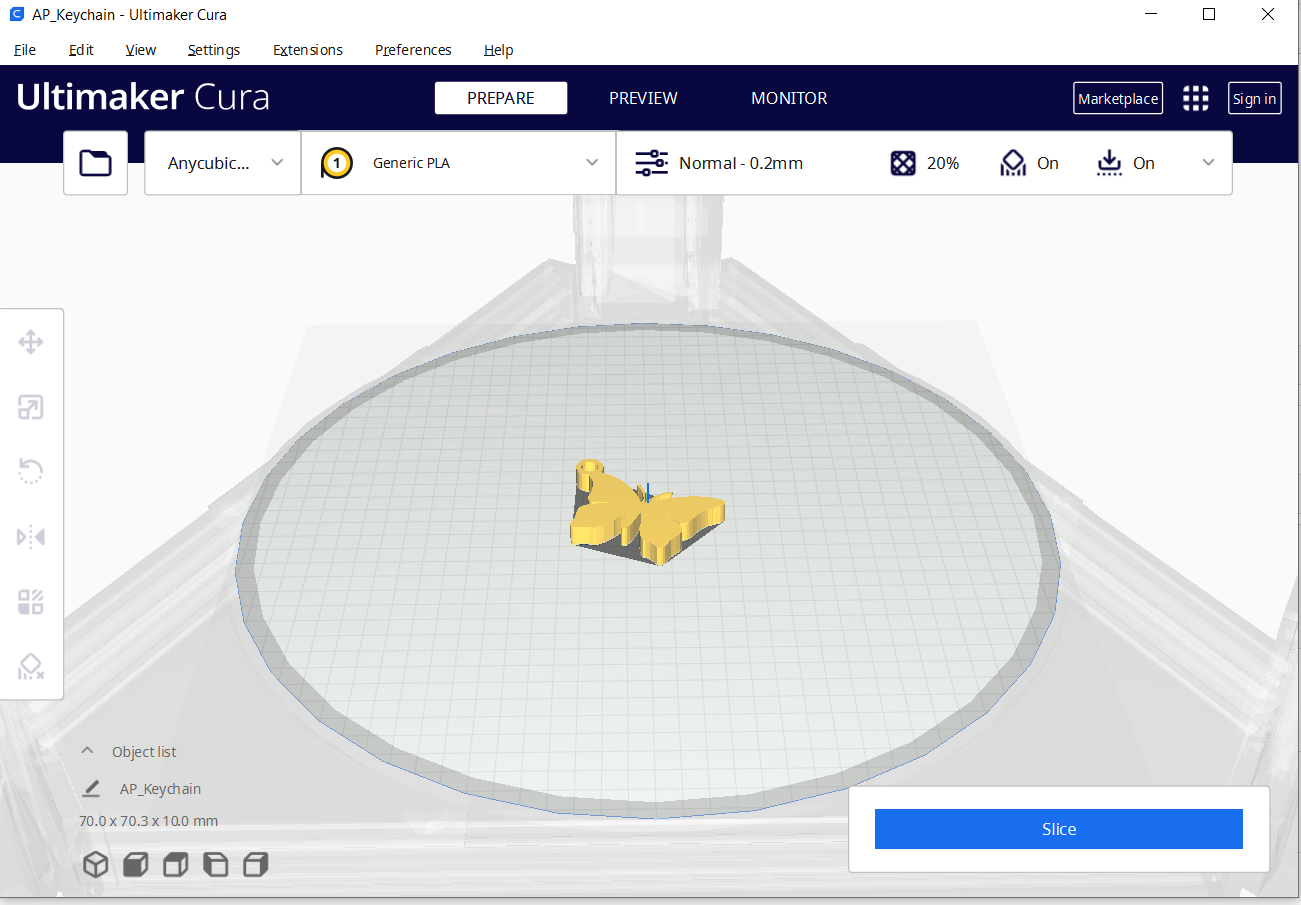
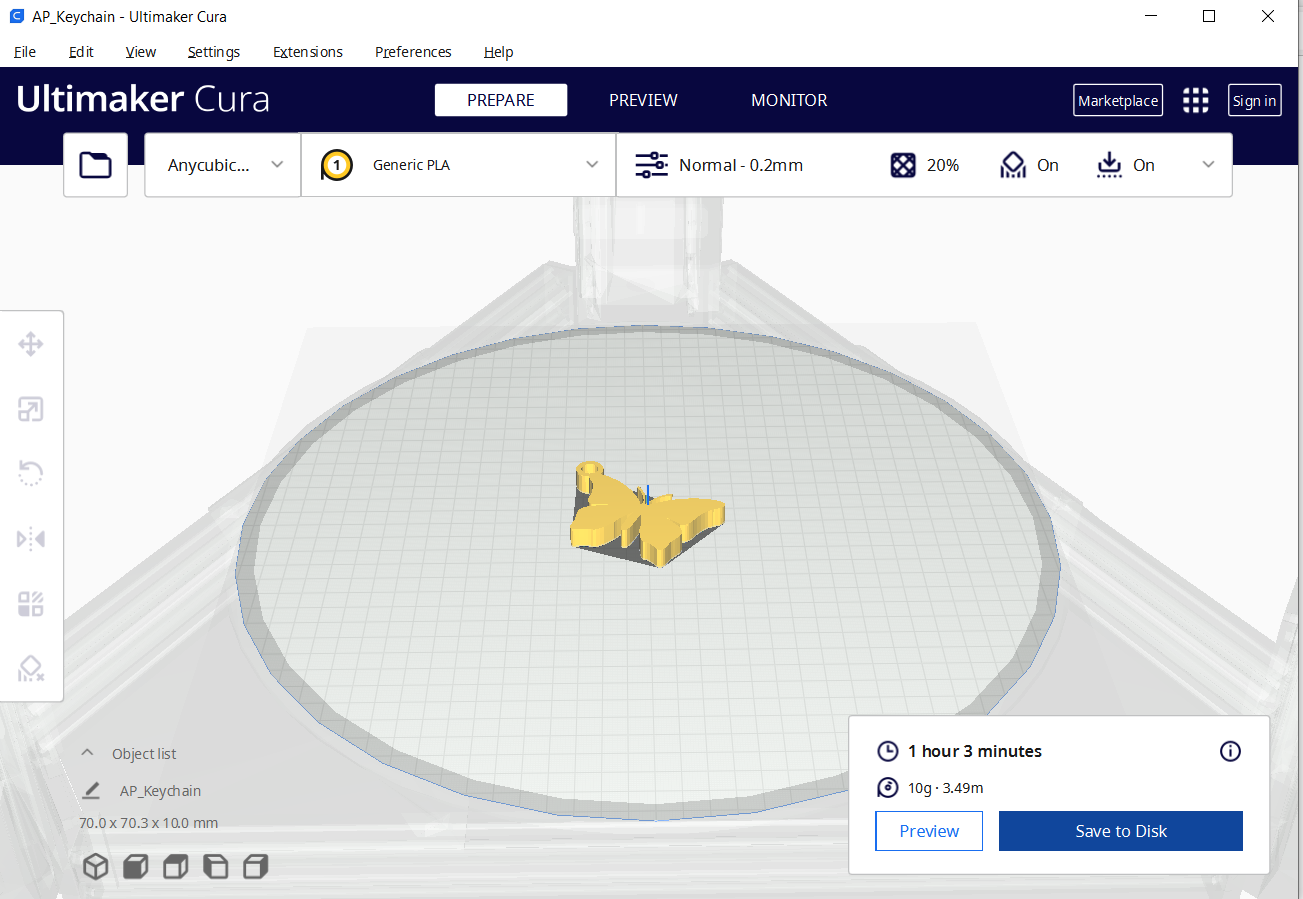
And after pressing the “Slice” button at the bottom in the right corner your design will be cutted in slices and it will tell you how long it will take to print your design(Time) and how much filament it will use to print it(gram and meters).
The next step is to make some adjustment before printing.
- Scale (Important to get the exact dimensions)
- Rotate (can rotate in any direction)
- Lay Flat (Make sure your print is flat. It makes a big difference when printing)
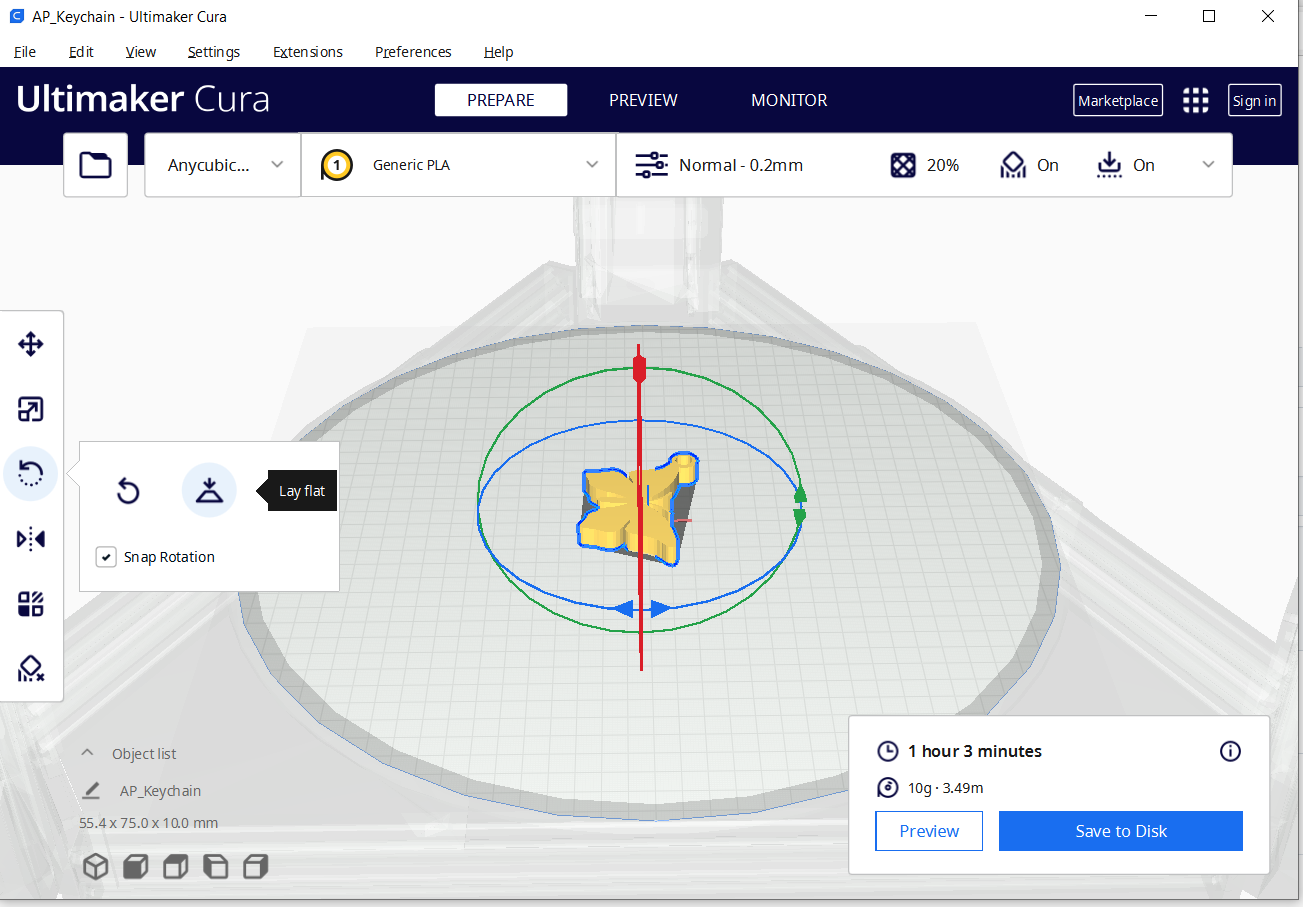
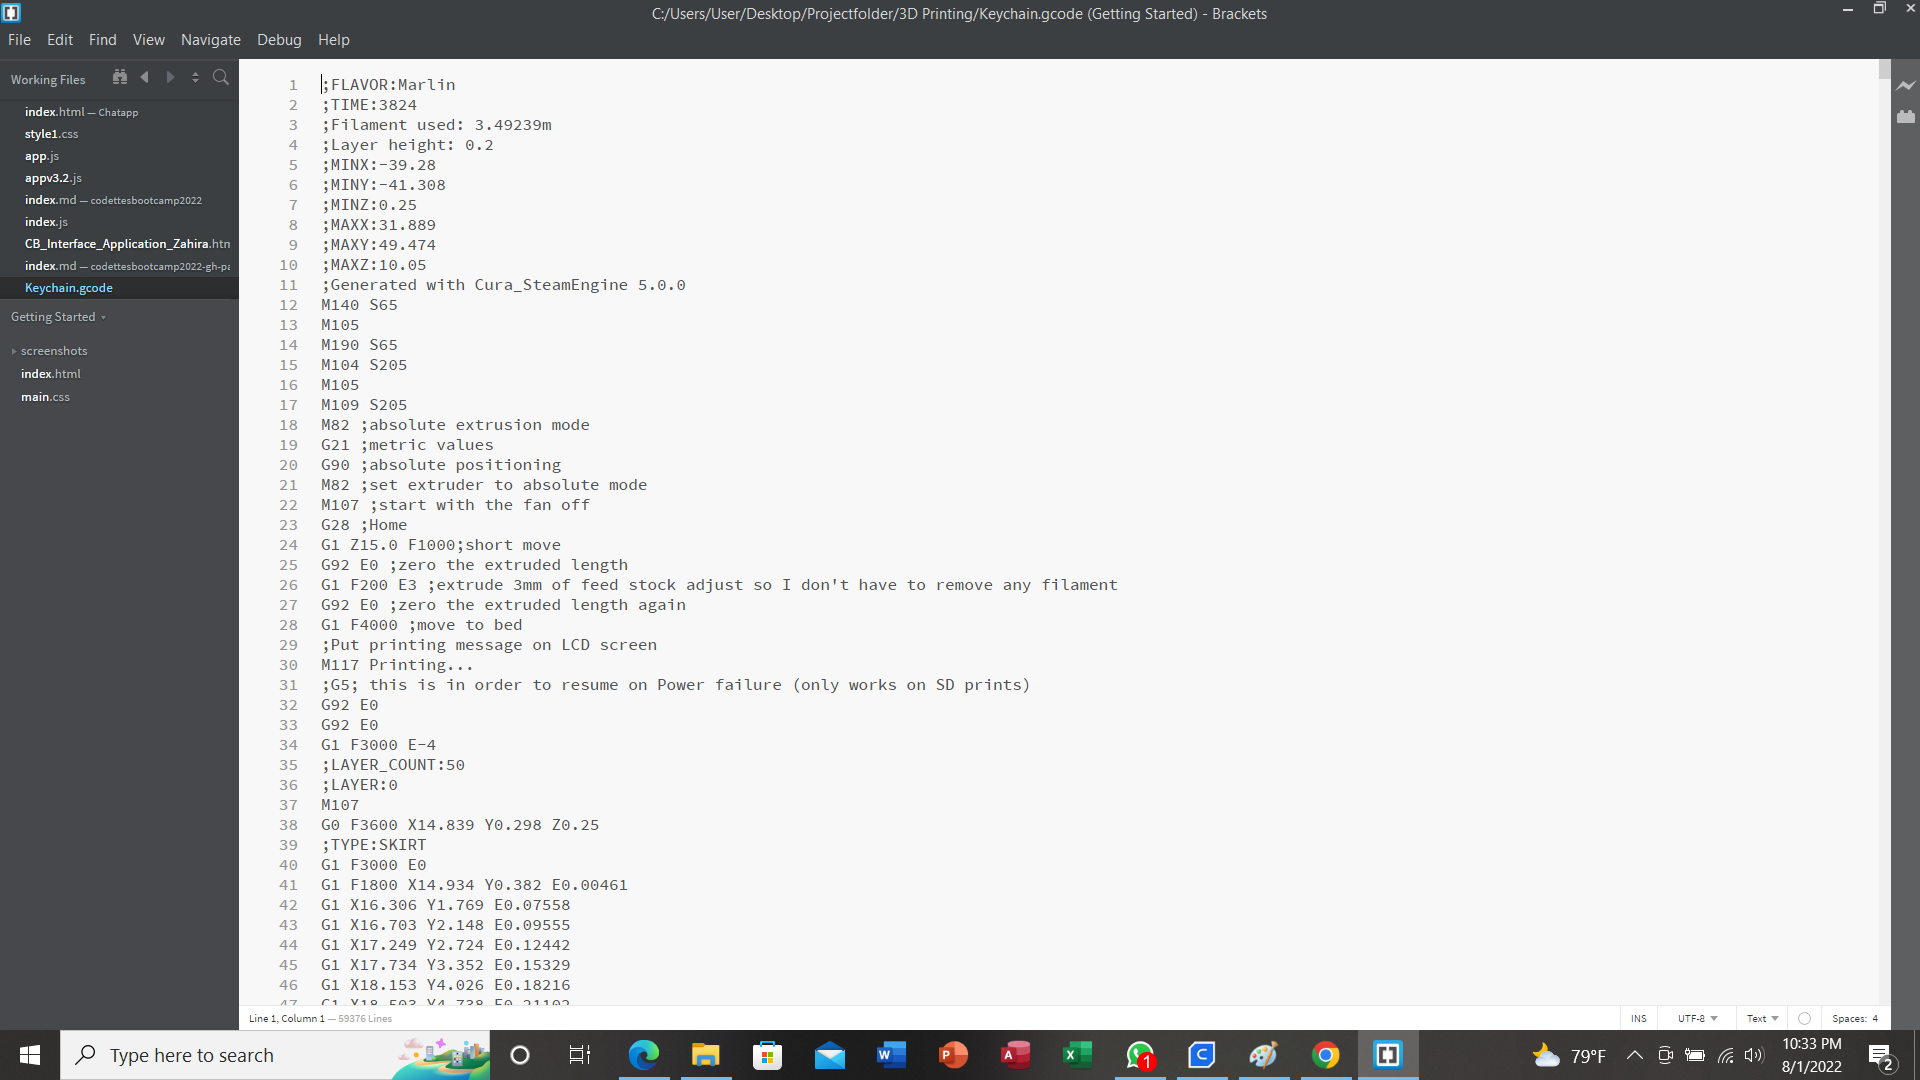
Now the object is finished for printing and we must press the “Save to disk” button which will save the object as a gcode file.
G-code stands for “geometric code,” and it tells the machine how to move. It relates to the geographical coordinates of the machine arm so that it knows how and where to move.

If i open the g.code file in brackets it looks like the image below. It is a very long code